Apologies for disappearing in December - the holidays sort of got away from me. So today I have a couple finished manicures from Christmas and the first week in January to show you, and then next week I'll have a new tutorial to post.
For Christmas this year, I used these cute decals from Born Pretty. Speaking of which, Born Pretty has offered Nail Art Tuesday shoppers 10% off your order when you use code: SQUOVAL15 at checkout.
The fun part about the Christmas mani (aside from those lovely water decals) was that my silver polish was way too thick. It was hard to work with, but it also made a 3-D, almost "fuzzy" line at the tips.
Last week I got some fun new Finger Paints polishes that I can't recall the names of just now (don't worry, you'll see them again). I decided to do a gradient with China Glaze "Tinsel" between the white and purple. I love how it turned out, very "winter whimsical", I think.
So that's what I've been up to polish-wise - next week, China Glaze "Dorthy Who?" and full nail stickers.
Until then - happy polishing!
Showing posts with label fun stuff. Show all posts
Catchin' Up
Posted by
lili
Labels:
3-D,
administrative,
Bi-color,
casual,
fancy,
french manicure,
fun stuff,
glitter,
gradients,
holiday,
water decals
Peppermint Swirls
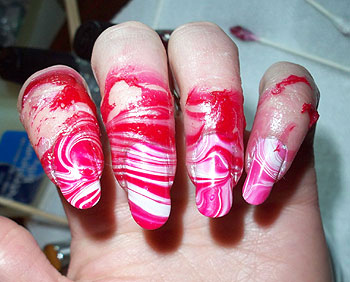
I apologize for the too-bright pictures...my room lighting is just too low tonight. I think you get the idea though - fun red & white peppermint-y swirls! I had a ton of fun doing these, but I was up until 3am because, well, things have to dry, and clean-up, while much easier this time still takes...time. But I ramble.
I started things off with a base of China Glaze base coat topped with two coats of CG "White Out".
The rest of my right hand went pretty well though - these fingers were done using red as the first color dropped (first photo above). Are you ready? I told you this was a messy job (ie, really fun!)...
Then I switched it up for my left hand, and dropped the white color first (2nd photo above). I also did the middle three fingers at the same time - worked great!
I look like a sick zebra. LOL After I got done dipping, I put on two coats of Zoya topcoat, and used Qtica half-time drops to dry everything quickly. After it was dry, I used a paper towel to just wipe away the excess polish along with the pet. jelly. The cuticles still needed a little clean-up in the shower this morning, but not much at all.
And voila! Peppermint swirls, all cleaned up.
I've got some Christmas decals for next week, appropriately enough. Until then, happy polishing!
I started things off with a base of China Glaze base coat topped with two coats of CG "White Out".
You'll notice that my fingers are a little shiny. I was going to use cuticle oil to block the excess polish this time, but in light of our fruit fly problem (which has since been controlled, thank goodness), I decided to use petroleum jelly instead (no scent). For the record, it worked great.
Then I had the brilliant idea to use glitter polish for swirling. I'll save you the whole sordid story, but just FYI - CG Ruby Pumps and Tinsel do *not* work for water marbling. I started over with Pure Ice "Platinum" and Sinful Colors "Ruby Ruby". Much nicer.
I should have taken photos of the swirls - I used an orange stick and started in the center, just swirling the colors together. The first one came out a bit too wide:The rest of my right hand went pretty well though - these fingers were done using red as the first color dropped (first photo above). Are you ready? I told you this was a messy job (ie, really fun!)...
Then I switched it up for my left hand, and dropped the white color first (2nd photo above). I also did the middle three fingers at the same time - worked great!
I look like a sick zebra. LOL After I got done dipping, I put on two coats of Zoya topcoat, and used Qtica half-time drops to dry everything quickly. After it was dry, I used a paper towel to just wipe away the excess polish along with the pet. jelly. The cuticles still needed a little clean-up in the shower this morning, but not much at all.
And voila! Peppermint swirls, all cleaned up.
I've got some Christmas decals for next week, appropriately enough. Until then, happy polishing!
Green Marble
I missed the Tuesday post again - but I have a good excuse! I was up until 3am experimenting with my first water-marbling attempt...I need more practice, but it was pretty fun (and super-messy). I took a lot of pictures (more than I'm posting), so it's taken me awhile to get them all cropped and posted for you. I'll warn you though, this is just as much a "what not to do" post than a tutorial...
I watched a bunch of videos on water marbling before I started, and gathered a bunch of things for my experiment. I decided to use mostly greens and one yellow-green just so if I screwed up, it would at least be monochrome (I ended up using only four colors). Other things I got included a bowl of cool water, cotton buds, tape, an orange stick, and some tiny little iridescent rhinestones that Sparkly Nails sent me for review. And a strawberry soda, of course.
Polishes Used
- OPI "Here Today, Aragon Tomorrow"
- Sinful Colors "Show Me The Way"
- Zoya "Tangy"
- Zoya "Bekka"
By the way, have you *seen* the new Zoya winter colors? Between those and Nubar, I may go broke this month...but I digress.
Anyway. I started by prepping my nails - file, buff and then put tape just under my nails in an attempt to keep the skin cleaner. I've since read that petroleum jelly works just fine, and it's probably easier to take off than tape. I'm going to try that next time - the tape is a pain to get off when you're done.
I added one coat of base coat, and then decided to use "Bekka" as my main base color. I only did one coat since I planned to use it in the marbling as well. In hindsight, two coats of the base color would have been better.
That taken care of, it was time for fun. I added a few drops each of "Here Today, Aragon Tomorrow", then "Show Me The Way", followed by "Tangy" and finally "Bekka". Each new color right in the center of the previous colors.
I used an orange stick to sort of pull the center out to the edges and mingle the colors. The polish texture in the water is kind of like really thin plastic wrap - so you can manipulate it, but it's still somewhat fragile. In hindsight, I'd use a toothpick for mixing the colors.
I held it there for a few seconds, and used a cotton bud to gently pull all the excess polish away. It was pretty easy, but later I "wrapped" the excess polish back over my nail on accident - be careful not to do that unless you mean to (it creates globs). After I had the excess polish out of the way, I pulled my nail out.
I had enough undisturbed polish to do one more with a similar design...
I'll spare you the long and messy details, but this is what one whole hand looked like after I finished with all the nails. I experimented with pulling the polish in toward the center, swirling it, etc.
At this point, I took the tape off - which was a huge hassle. Then I used the teeny little rhinestones to add just a little bling (and to cover up some little dings & dents).
I used cotton buds to clean up my fingers afterwards, and my normal "orange stick in the shower" method of cleaning up my cuticles the next morning.
And there you have it - whew! Obviously I need practice, but it's fun, and I plan to do some more very soon.
Not sure what I'll do next week - pumpkins or leaves, perhaps? Until then, happy polishing!
Camoflauged Shamrocks
Green and shamrocks aboud on the nail blogs this week - St. Patrick's Day is coming! I've been planning to use Rimmel's "Camoflauge" for this - it's a 60 second drying polish, which I normally would never use due to wearability issues, but the color is just perfect for this holiday. My original thought was to freehand shamrocks in white, but I chickened out, and decided to use these little plastic hearts and gold boullion beads instead.
I started with two coats of Camoflauge - it doesn't dry in quite 60 seconds, but close enough. I'd forgotten how quick you have to move with the fast-dry polishes...a slight delay can cause definite brush marks.
Then I started with one tiny plastic metallic heart. I used a flash here so it would be clear, but the hearts don't really show red at all on my nails. They're more like the first (and last) photos.
Another heart to the side for the second leaf....
And a third heart to complete the shamrock. I did four on my index fingers for "lucky clovers".
I finished them off with four gold boullion beads for the stems, and two coats of my (bubbly) top coat.
Cleaned them up, and took a few finished photos without the flash. The first and last photos here are very true to color, at least from my perspective.
This manicure didn't take me long at all - an hour maybe, start to finish? And the metallic mirror finish on the hearts picks up on the green/gold polish, so what you see in that last photo is very true to how they look in both natural and "office" lighting. Very cool effect, I think.
Do you have shamrocks on your nails this week? Do share!
I started with two coats of Camoflauge - it doesn't dry in quite 60 seconds, but close enough. I'd forgotten how quick you have to move with the fast-dry polishes...a slight delay can cause definite brush marks.
Then I started with one tiny plastic metallic heart. I used a flash here so it would be clear, but the hearts don't really show red at all on my nails. They're more like the first (and last) photos.
Another heart to the side for the second leaf....
And a third heart to complete the shamrock. I did four on my index fingers for "lucky clovers".
I finished them off with four gold boullion beads for the stems, and two coats of my (bubbly) top coat.
Cleaned them up, and took a few finished photos without the flash. The first and last photos here are very true to color, at least from my perspective.
This manicure didn't take me long at all - an hour maybe, start to finish? And the metallic mirror finish on the hearts picks up on the green/gold polish, so what you see in that last photo is very true to how they look in both natural and "office" lighting. Very cool effect, I think.
Do you have shamrocks on your nails this week? Do share!
Posted by
lili
Labels:
beads,
casual,
easy,
flat shapes,
fun stuff
Sparkly Trees
I had this great idea for stylized white trees on a red backdrop this week. At first, I was thinking of them on glittery red "Ruby Pumps" from China Glaze. But I'm tired of taking glitter polish off, and wanted a break (since I'll inevitably have glitter on again for New Years). So I decided on Zoya's "Alix" instead, a dark blue red that does crazy things when presented with a flash. Photos with a flash below just look garish - the ones with a yellowish cast signaling natural light show the color very close to it's true state.
I started with two coats of Alix on my nails.
Then I did the white "swish" trees with a nail art pen. Yeah - that did not turn out so well. Plan B = rhinestone trees. I started with one stone at the "top" of each tree.
Then it was just a matter of adding rows - I used three rows of stones for the triangle tree shape:
And then two stones below that for the "trunk".
Repeat on all fingers, setting the stones into a coat of top coat. I didn't get them all straight, but that's what happens when you're doing nail art at 1:30am. I'm wishing I'd snowed the tips with white glitter, but I think they turned out well, regardless. I ran out of green stones, so had to do some white (aluminum?) trees and red for my little finger.
Two more coats of top coat (which I didn't get even, unfortunately), and then clean up. Voila! Sparkly tree nails!
As I mentioned above, this is the "true color" of Alix - the bright, orange red above is the result of the flash.
What's on your tips for Christmas? Next week, a New Year's mani (my normal new years colors are blue and silver).
Happy Polishing!
I started with two coats of Alix on my nails.
Then I did the white "swish" trees with a nail art pen. Yeah - that did not turn out so well. Plan B = rhinestone trees. I started with one stone at the "top" of each tree.
Then it was just a matter of adding rows - I used three rows of stones for the triangle tree shape:
And then two stones below that for the "trunk".
Repeat on all fingers, setting the stones into a coat of top coat. I didn't get them all straight, but that's what happens when you're doing nail art at 1:30am. I'm wishing I'd snowed the tips with white glitter, but I think they turned out well, regardless. I ran out of green stones, so had to do some white (aluminum?) trees and red for my little finger.
Two more coats of top coat (which I didn't get even, unfortunately), and then clean up. Voila! Sparkly tree nails!
As I mentioned above, this is the "true color" of Alix - the bright, orange red above is the result of the flash.What's on your tips for Christmas? Next week, a New Year's mani (my normal new years colors are blue and silver).
Happy Polishing!
Posted by
lili
Labels:
casual,
fun stuff,
Monochrome,
rhinestones
All Wrapped Up
This week, I needed something quick due to switching my manicure days around. So I decided to "wrap up" my nails in festive China Glaze "Emerald Sparkle", with some little red bows I found in my nail art stuff. This is a super-quick manicure, if you're looking for something speedy.
First step - two coats of Emerald Sparkle over one coat of base:
Then I used a silver Stripe-rite nail art brush to slip a "ribbon" down the center of each nail. Normally I would offset this to the side a little, but the bows are largish, and my nails are very curved, so they work best in the center to make sure the edges seal down. It's annoying getting stones of any shape caught in clothing, hair, etc.
Then another silver "ribbon" across the first:
So there are little ribbon crosses on each nail, like a ribbon on a package.
Any embellishment will work for the next step - one year I did red nails, white stripes and little clay peppermints at the intersection. I used these cute red bow-shaped stones, one in the center of each intersection, set in top coat.
Two coats of top coat over the whole thing to seal, and clean 'em up!
Voila! A neatly wrapped tip for each finger.
What's on your tips this week? Anything festive?
First step - two coats of Emerald Sparkle over one coat of base:
Then I used a silver Stripe-rite nail art brush to slip a "ribbon" down the center of each nail. Normally I would offset this to the side a little, but the bows are largish, and my nails are very curved, so they work best in the center to make sure the edges seal down. It's annoying getting stones of any shape caught in clothing, hair, etc.
Then another silver "ribbon" across the first:
So there are little ribbon crosses on each nail, like a ribbon on a package.
Any embellishment will work for the next step - one year I did red nails, white stripes and little clay peppermints at the intersection. I used these cute red bow-shaped stones, one in the center of each intersection, set in top coat.
Two coats of top coat over the whole thing to seal, and clean 'em up!
Voila! A neatly wrapped tip for each finger.What's on your tips this week? Anything festive?
Posted by
lili
Labels:
easy,
fancy,
fun stuff,
holiday,
rhinestones
Candy Cane Stripes
First, my apologies for the lack of post last week. Crazy happenings all over the place, and I never got a chance to post. This week starts the Christmas season though, and four weeks of holiday manicures, which I'm actually looking forward to this year (as opposed to being "not ready" just yet). I decided to kick the month off with some reverse candy cane stripes. I couldn't quite make up my mind on the tips, so you'll see where I changed my mind mid-polish further down.
I used the China Glaze "Ruby Pumps" and "Tinsel" to start, along with my white Migi Nail Art Pen, and some silver bouillon beads.
I started with a base of 2 coats Ruby Pumps (over Zoya basecoat).
Then I attempted to "sugar" the tips with Tinsel. I didn't get the polish thin enough, unfortunately, so ended up with more silver color than I'd hoped.
Then I drew on some diagonal white stripes on the main part of my nails with the nail art pen - obviously, I'm not a perfectionist, but I think they turned out okay.
I couldn't decide whether to define the tips with a line or not, so I tried black on my thumb. Too harsh, I decided.
Silver beads didn't tone it down enough, so I decided to skip the line altogether on my other nails.
I laid them in top coat on my other nails. Tip - do one half of the nail at a time, that way the top coat won't dry before you get all the way across the nail. I defined the tips with silver beads, then took stock. Decided I didn't really like the silver tips with all the other stuff going on - just too much.
So back to red for the tips. Much better, I think. Right about here I was wishing I had some white faux fur to use in place of the silver beads - don't you think that would be cute as a sort of "cuff" for the tips?
A few coats of top coat, some clean up, and voila - shiny, glittery candy nails.
My right hand, blurry, but looking pretty good.
Next week, another holiday themed mani - what are you wearing on your nails this week?
I used the China Glaze "Ruby Pumps" and "Tinsel" to start, along with my white Migi Nail Art Pen, and some silver bouillon beads.
I started with a base of 2 coats Ruby Pumps (over Zoya basecoat).
Then I attempted to "sugar" the tips with Tinsel. I didn't get the polish thin enough, unfortunately, so ended up with more silver color than I'd hoped.
Then I drew on some diagonal white stripes on the main part of my nails with the nail art pen - obviously, I'm not a perfectionist, but I think they turned out okay.
I couldn't decide whether to define the tips with a line or not, so I tried black on my thumb. Too harsh, I decided.
Silver beads didn't tone it down enough, so I decided to skip the line altogether on my other nails.
I laid them in top coat on my other nails. Tip - do one half of the nail at a time, that way the top coat won't dry before you get all the way across the nail. I defined the tips with silver beads, then took stock. Decided I didn't really like the silver tips with all the other stuff going on - just too much.
So back to red for the tips. Much better, I think. Right about here I was wishing I had some white faux fur to use in place of the silver beads - don't you think that would be cute as a sort of "cuff" for the tips?
A few coats of top coat, some clean up, and voila - shiny, glittery candy nails.
My right hand, blurry, but looking pretty good.
Next week, another holiday themed mani - what are you wearing on your nails this week?
Posted by
lili
Labels:
Bi-color,
fun stuff,
holiday,
Migi Nail Pens