Showing posts with label Bi-color. Show all posts

Wearing O'The Green

It's still Tuesday here. ;-) I'm afraid I don't have a tutorial for you (because I've been a total slacker), but I have three green manicures to share for St. Patrick's Day this week...

All of these designs were done with 1 coat Seche Vite base coat, 2 coats base polish, and the stones set in two coats of Seche Vite top coat. I should buy stock in Seche Vite...

First off, we have my favorite green polish, China Glaze "Emerald Sparkle", tipped with OPI's "Here Today, Aragon Tomorrow" (which looks black, but is really very dark green). I added light green rhinestones to the center for interest. I love this manicure - super simple to do, yet casual/elegant. 


Next up, I used a base polish of Rimmel's 60 Second polish in "Camouflage" - a lovely color, but as you can see I had some trouble with tip pull. Gotta remember to wrap the polish at the nail edge, peeps! Then I put a swoop of white diagonally across the nail, and a glittery gold Sinful color as a base for some large and small light green stones. It was really much more subdued than the picture shows - apologies for the flash. 

 And of course this week, it's back to my favorite Emerald Sparkle, with more of the light green rhinestones arranged into shamrocks on three nails each hand. Aside from my thumb (which I tried to make 4-leaf), they turned out nicely, I think.


Larger rhinestones compliments of the Born Pretty Store, and I purchased the smaller stones from Nail Delights. 

Finally, I saw Nail Art Tuesday mentioned in a blog round-up recently, but I can't find the post again. :-( Whoever you are, thanks so much for the mention! I appreciate it. :-) 

Next week, back to tutorials. Until then, Happy Polishing - and Happy St. Patrick's Day!

Nail Love

Hello there, neglected little nail art blog. Did you miss me? I've been doing my nails, but most of January was spent getting my latest book, Desert Heat up for sale, and writing up a storm on new books. And I'll admit that this month, I've been incredibly lazy about photo editing. But no more!

To get back into things, a simple Valentine's Day manicure...
 I started with a base of Avon's "Pink Radiance", just 2 coats over Seche Vite base coat.

Then I used my handy-dandy dotting tool from Born Pretty Store to dot a big heart on each nail in white. 

And that's it - two coats of Seche Vite top coat, and clean up. Unfortunately I've got a little tip-pull going on, but it's my own fault for not doing the undersides of my nails. Voila! Simple, casual Valentine's Day nails. 

Until next week (no, really!), happy polishing...

Catchin' Up

Apologies for disappearing in December - the holidays sort of got away from me. So today I have a couple finished manicures from Christmas and the first week in January to show you, and then next week I'll have a new tutorial to post.

For Christmas this year, I used these cute decals from Born Pretty. Speaking of which, Born Pretty has offered Nail Art Tuesday shoppers 10% off your order when you use code: SQUOVAL15 at checkout.


The fun part about the Christmas mani (aside from those lovely water decals) was that my silver polish was way too thick. It was hard to work with, but it also made a 3-D, almost "fuzzy" line at the tips.

Last week I got some fun new Finger Paints polishes that I can't recall the names of just now (don't worry, you'll see them again). I decided to do a gradient with China Glaze "Tinsel" between the white and purple. I love how it turned out, very "winter whimsical", I think.

So that's what I've been up to polish-wise - next week, China Glaze "Dorthy Who?" and full nail stickers.

Until then - happy polishing!

Peppermint Swirls

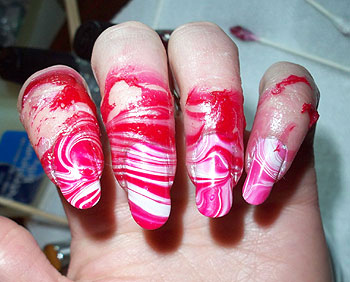
I apologize for the too-bright pictures...my room lighting is just too low tonight. I think you get the idea though - fun red & white peppermint-y swirls! I had a ton of fun doing these, but I was up until 3am because, well, things have to dry, and clean-up, while much easier this time still takes...time. But I ramble.

I started things off with a base of China Glaze base coat topped with two coats of CG "White Out".
 You'll notice that my fingers are a little shiny. I was going to use cuticle oil to block the excess polish this time, but in light of our fruit fly problem (which has since been controlled, thank goodness), I decided to use petroleum jelly instead (no scent). For the record, it worked great. 

Then I had the brilliant idea to use glitter polish for swirling. I'll save you the whole sordid story, but just FYI - CG Ruby Pumps and Tinsel do *not* work for water marbling. I started over with Pure Ice "Platinum" and Sinful Colors "Ruby Ruby". Much nicer. 
I should have taken photos of the swirls - I used an orange stick and started in the center, just swirling the colors together. The first one came out a bit too wide:
The rest of my right hand went pretty well though - these fingers were done using red as the first color dropped (first photo above). Are you ready? I told you this was a messy job (ie, really fun!)...
Then I switched it up for my left hand, and dropped the white color first (2nd photo above). I also did the middle three fingers at the same time - worked great!
I look like a sick zebra. LOL After I got done dipping, I put on two coats of Zoya topcoat, and used Qtica half-time drops to dry everything quickly. After it was dry, I used a paper towel to just wipe away the excess polish along with the pet. jelly. The cuticles still needed a little clean-up in the shower this morning, but not much at all.

And voila! Peppermint swirls, all cleaned up.
I've got some Christmas decals for next week, appropriately enough. Until then, happy polishing!

Sparkly Ornaments

This week, I needed something to help me get in the mood for Christmas, and I needed a quick design. So I got out these huge rhinestones that the Born Pretty store sent for review. I think they look very much like shiny glass ornaments, don't you?
I started with one of my favorite Christmas glitters, China Glaze "Emerald Sparkle". Two coats over CG base coat makes a nice "tree" layer.
Then I added a thick diagonal stripe in China Glaze "Tinsel", another of my favorite CG polishes. Just one, somewhat thick coat worked fine for setting the stones.
I added three stones to each nail, using red and yellow...
And switched the colors on my index fingers for just a little variety.
Two coats China Glaze quick dry top coat, some clean up, and voila! Sparkly ornaments telling me it's time to get moving on the holiday stuff.
**Edited to add - Born Pretty Store is offering a 10% discount until December 31st, 2010 - use coupon code OPENTENOFF. I may just do that myself, actually. :-)

I'm kind of itching to try a peppermint swirl water marble thing - perhaps I'll do that next week. Until then, happy polishing!

Crackle & Dupe

This week it's all about the crackle polish, and I stumbled over a fun dupe as well! Many thanks to Born Pretty for providing me with the black "Crack Polish" used this week. They sent me some other goodies for review that I'll be using over the next few weeks too.
Apologies for the yellow tone on this photo - it gets better. ;-) When I decided to play with the crackle polish, I decided something really bright underneath would work best. I went digging in the fridge for a nice bright pink, and came up with these two - Urban Decay's "Big Bang", and Avon's new "Pink Radiance".
They looked so close in the bottle, I just had to see them side-by-side on my nails. So I used Big Bang on my index finger below, and Pink Radiance on my middle finger. Can you see the difference? Me either - they really are an exact match, in my opinion. Fun, yes?
After my little dupe discovery, it was time to get down to business. I used the Avon polish for the rest, because the bottle is easier to deal with than the tiny (and cute) Urban Decay bottle. Undersides first...
And then two coats each to lay down a nice base for the crackle polish.
Then it was time to crackle! I used one very thin coat, then watched it crack as it dried. Super fun to watch the cracks form like magic.
On my right index finger, I did just the tip, but I got the polish on very thick, so it didn't crack as nicely as I'd have liked. As you can see though, it cracked nicely on the other nails.
On my left hand, I did a thinner coat on the tip of my ring finger, which worked a bit better.
I coated the whole thing with two coats of Seche Vite top coat - be careful with this, it will smear if you slide the brush on the crackle polish. Use a lot of top coat, and just float it on top the polish for the first coat to avoid smearing. Then cleaned up my cuticles, and voila - a very cool, leathery look.
I *need* some green crackle polish now, so I can do a reptile look over yellow polish. :-) Next time I will make sure the crackle polish is closer to the edges of my nails - it looks a bit messy even after cleanup just because it tends to break/chip a the crack lines if you aren't careful. It's really fun though - I love it...very hip, in my opinion.

Next week, I'll start the Christmas manicures...better dig out my red, white and greens! Until then, happy polishing...


All About A Russian Party

I was trying to decide what to do this week, starting really late, and was super-tired. So I opted to try a gradient again, and had moderate results (mostly due to being really tired, I think). The colors I used are OPI's "Russian to a Party", a reddish maroon w/gold shimmer and Sinful Colors "All About You" - a sheer gold glitter.
To start, I layered two coats of RTAP over base coat.
Next I put a thin layer of glitter over 3/4 of each nail starting at the base.
Then another coat of glitter, stopping a half way up the nail:
And finally one more strip just up at the base of the nail.
Two coats of top coat and some clean-up finishes it off nicely. 
I got the glitter too thick in spots...next time I'll be more careful about that. It takes a light touch to get the gradient effect. I may actually try with one of the CND effects polishes next time. 

Born Pretty sent me some free stuff to review, including some fun black crackle polish. So next week, a tutorial on crackle polish - should be very cool, I think. Until then, happy polishing!

Green Marble

I missed the Tuesday post again - but I have a good excuse! I was up until 3am experimenting with my first water-marbling attempt...I need more practice, but it was pretty fun (and super-messy). I took a lot of pictures (more than I'm posting), so it's taken me awhile to get them all cropped and posted for you. I'll warn you though, this is just as much a "what not to do" post than a tutorial...
I watched a bunch of videos on water marbling before I started, and gathered a bunch of things for my experiment. I decided to use mostly greens and one yellow-green just so if I screwed up, it would at least be monochrome (I ended up using only four colors). Other things I got included a bowl of cool water, cotton buds, tape, an orange stick, and some tiny little iridescent rhinestones that Sparkly Nails sent me for review. And a strawberry soda, of course. 

Polishes Used
- OPI "Here Today, Aragon Tomorrow"
- Sinful Colors "Show Me The Way"
- Zoya "Tangy"
- Zoya "Bekka" 

By the way, have you *seen* the new Zoya winter colors? Between those and Nubar, I may go broke this month...but I digress. 

Anyway. I started by prepping my nails - file, buff and then put tape just under my nails in an attempt to keep the skin cleaner. I've since read that petroleum jelly works just fine, and it's probably easier to take off than tape. I'm going to try that next time - the tape is a pain to get off when you're done. 
I added one coat of base coat, and then decided to use "Bekka" as my main base color. I only did one coat since I planned to use it in the marbling as well. In hindsight, two coats of the base color would have been better. 
That taken care of, it was time for fun. I added a few drops each of "Here Today, Aragon Tomorrow", then "Show Me The Way", followed by "Tangy" and finally "Bekka". Each new color right in the center of the previous colors. 


I used an orange stick to sort of pull the center out to the edges and mingle the colors. The polish texture in the water is kind of like really thin plastic wrap - so you can manipulate it, but it's still somewhat fragile. In hindsight, I'd use a toothpick for mixing the colors.

I sort of wanted a striped design, so when I put my finger in, I laid it flat on top the outer edge of the polish, and pushed down into the water.
I held it there for a few seconds, and used a cotton bud to gently pull all the excess polish away. It was pretty easy, but later I "wrapped" the excess polish back over my nail on accident - be careful not to do that unless you mean to (it creates globs). After I had the excess polish out of the way, I pulled my nail out.
I had enough undisturbed polish to do one more with a similar design...
I'll spare you the long and messy details, but this is what one whole hand looked like after I finished with all the nails. I experimented with pulling the polish in toward the center, swirling it, etc.
At this point, I took the tape off - which was a huge hassle. Then I used the teeny little rhinestones to add just a little bling (and to cover up some little dings & dents). 
I used cotton buds to clean up my fingers afterwards, and my normal "orange stick in the shower" method of cleaning up my cuticles the next morning. 
And there you have it - whew! Obviously I need practice, but it's fun, and I plan to do some more very soon. 

Not sure what I'll do next week - pumpkins or leaves, perhaps? Until then, happy polishing!