It is kind of hard to tell but I actually couldn't fit the whole word "BLOOD" on the thumb :( Oh well I still like them. I started with two coats of Sinful Colors Back on Black. I then did splatter on all nails except the thumbs using Sally Hansen Xtreme Wear Cherry Red. I used a striping brush and WnW French White Creme to paint the letters and the fangs. This design was surprisingly simple to do and I love the way it turned out! Any other True Blood fans out there? Remember not to tell me about what happened :)
Showing posts with label Wet N Wild. Show all posts
True Blood Mani
In honor of the season premiere of True Blood, which happens to be my favorite TV show ever!! The season premiere was last night but I don't have HBO so I have to wait until tonight to watch it so don't tell me what happened!! I have been waiting so long for this season to start! I am going to keep this short and sweet so here they are:
Posted by
lili
The Picnic Nails Won!!!
Thanks everyone for voting!!!
The Balloon nails had 2 votes, the Picnic nails had 10 votes, and there was 1 vote for alternating.
Just a warning, my nails are now short :( You can see in the pictures that the ring finger nail is even shorter than the rest because that is the one that I broke. I couldn't bring myself to cut down the rest of my nails that short but it shouldn't take too long for the lengths to even out since my nails grow pretty fast. I am still getting used to the short nails and I don't really like them yet. It is kind of like when you get a whole bunch of hair cut off and you don't really like it until like a week later when you get used to it.
On to the Picnic theme... The picnic at work was lots of fun and I ate way too much. Since my nails are shorter I decided to put less of the fiilmo clay fruit pieces on my nails. I decided to just go with watermelon because I was too lazy to cut any of the other pieces.
For this mani I used WnW French White Creme as the base. Then I painted on the lines vertically and horizontally using a light pink art deco polish. Once those were dry I used a small brush and a red art deco polish to paint the red parts of the picnic pattern. Then Using two different sized dotting tools and Sinful Colors Black on Black, I dotted on the ants bodies. I used a striping brush to paint on the legs and antennas. I also added some silver details to the ants to make them look more 3d. I stuck the watermelon pieces on and coated the whole thing with SV which unfortunately bubbled on this design.
My giveaway will be ending at midnight tonight and I will be announcing the winner tomorrow so don't forget to enter!!!
The Balloon nails had 2 votes, the Picnic nails had 10 votes, and there was 1 vote for alternating.
Just a warning, my nails are now short :( You can see in the pictures that the ring finger nail is even shorter than the rest because that is the one that I broke. I couldn't bring myself to cut down the rest of my nails that short but it shouldn't take too long for the lengths to even out since my nails grow pretty fast. I am still getting used to the short nails and I don't really like them yet. It is kind of like when you get a whole bunch of hair cut off and you don't really like it until like a week later when you get used to it.
On to the Picnic theme... The picnic at work was lots of fun and I ate way too much. Since my nails are shorter I decided to put less of the fiilmo clay fruit pieces on my nails. I decided to just go with watermelon because I was too lazy to cut any of the other pieces.
My giveaway will be ending at midnight tonight and I will be announcing the winner tomorrow so don't forget to enter!!!
Posted by
lili
Labels:
Art Deco,
Dotting Tool,
Filmo Canes,
Nail Art,
Wet N Wild
Splatter Nail Art
I saw a couple blogs that had some splatter nail art and decided to try it myself... I am in love with this new nail art technique. I attempted water marbling once and it turned out horrible and I hated doing it and I haven't done it since. I did one hand with water marbling and then took it off immediately because it was such a horrible mess. This technique makes up for my failure at water marbling and so much more!!!! I will post a picture tutorial on how to do this tomorrow so be sure to check back! Our summer camp at the daycare started this week and I wanted to have fun colorful nails for the first day so this is what I ended up with:
My pointer finger and my middle finger are my favorites! The thumb turned out really cute too! These are like little works of modern art on my nails. Each one is different and unique. This technique is very fun to do as well :) Find out tomorrow how I did this! For this mani I first painted my nails with Wet N Wild French White Creme. For the splatter I used Jordana Pink Romance, Purple Bright, Boy Oh Boy, and Rich Green. I also used Sally Hansen Insta-Dri in Lightening for the yellow.
I am so in love with the Jordana polishes. I bought them from CherryCulture and if you can you should try these polishes. All of the colors that I have are such rich colors. The consistency of this polish is perfect and so far every one that I have is a one coater. These polishes are just so perfect... I must have more of them! Here are swatches of 5 Jordana Colors that I have:
From left to right: Rich Green, Boy Oh Boy, Burnt Sugar, Purple Bright, and Pink Romance. Aren't these Gorgeous?? Also in the next couple of days I will be posting more on my new color wheels like the one in the picture above!
My pointer finger and my middle finger are my favorites! The thumb turned out really cute too! These are like little works of modern art on my nails. Each one is different and unique. This technique is very fun to do as well :) Find out tomorrow how I did this! For this mani I first painted my nails with Wet N Wild French White Creme. For the splatter I used Jordana Pink Romance, Purple Bright, Boy Oh Boy, and Rich Green. I also used Sally Hansen Insta-Dri in Lightening for the yellow.
I am so in love with the Jordana polishes. I bought them from CherryCulture and if you can you should try these polishes. All of the colors that I have are such rich colors. The consistency of this polish is perfect and so far every one that I have is a one coater. These polishes are just so perfect... I must have more of them! Here are swatches of 5 Jordana Colors that I have:
From left to right: Rich Green, Boy Oh Boy, Burnt Sugar, Purple Bright, and Pink Romance. Aren't these Gorgeous?? Also in the next couple of days I will be posting more on my new color wheels like the one in the picture above!
Posted by
lili
Labels:
Jordana,
Splatter Nail Art,
Swatches,
Wet N Wild
Sunflowers In The Sky
I have seen so many cute sunflower manis and they just look so cute and summery so I decided to try a sunflower nail design of my own. This mani was done freehand and I feel like I am getting better at doing freehand. The possibilities are endless when doing freehand nail designs! I am going to let the pictures do the talking for this mani:
For this mani I did 2 coats of this mini Sally Girl polish which does not have a name on it... Two coats of this stuff was not fun. After putting on my base coat and the first coat of this I went back to do the second coat and the brush started taking off the first coat as I tried to gently stroke it on... it was useless, I had to let the first coat dry most of the way before putting on the second coat. Maybe it had something to do with the base coat but it was a pain in the butt.
Anyways, for the petals I used a striping brush from an art deco polish with Sally Hansen Insta-dri Lightening. The petals are not perfect but I feel like it makes it look more like a sunflower. Then using the same brush and WnW Sunny Side Up, I added some extra detail to the petals. For the centers of the sunflowers, I used Sinful Colors Nirvana and applied it with rounded brush. I coated the whole thing with SV as usual! The first 3 pictures are a more accurate representation of the true color of this polish.
For this mani I did 2 coats of this mini Sally Girl polish which does not have a name on it... Two coats of this stuff was not fun. After putting on my base coat and the first coat of this I went back to do the second coat and the brush started taking off the first coat as I tried to gently stroke it on... it was useless, I had to let the first coat dry most of the way before putting on the second coat. Maybe it had something to do with the base coat but it was a pain in the butt.
Anyways, for the petals I used a striping brush from an art deco polish with Sally Hansen Insta-dri Lightening. The petals are not perfect but I feel like it makes it look more like a sunflower. Then using the same brush and WnW Sunny Side Up, I added some extra detail to the petals. For the centers of the sunflowers, I used Sinful Colors Nirvana and applied it with rounded brush. I coated the whole thing with SV as usual! The first 3 pictures are a more accurate representation of the true color of this polish.
Posted by
lili
Labels:
Freehand,
Nail Art,
Sally Girl,
Sally Hansen Insta-Dri,
Sinful Colors,
Wet N Wild
Another Butterfly Mani
I loved my blue monarch butterfly mani so much that I had to do it again in a different color. I am going to keep this short and sweet today because it is going to be ein the 90's today and I will be spending the day outside in the sun! Here it is:
I used 2 coats of WnW Fast Dry in Ocean Grotto which is a new polish from their Mermaid Cove collection. I then used my two-way nail art pens in black and white to create the lines and dots. Those pens work so well for dotting! Then as usual I layered a nice coat of SV over the whole thing. This green is so pretty, if you are a sucker for green polish like I am then you must have this one. It has very fine gold shimmer in it. Happy Memorial day to everyone :)
Posted by
lili
Labels:
Freehand,
Nail Art,
Nail Pens,
Wet N Wild
Sticking with the Butterfly Mani
I loved my last butterfly mani so much that I wanted to stick with the butterfly theme. I also really wanted a chance to use my new brushes. I had seen a stamped butterfly somewhere out there that had been colored in with a different color and I remember thinking that it looked really pretty. I wasn't going to be happy with just one butterfly though so I did a whole bunch... 30 to be exact. After doing the butterflies I also decided to add some pink flowers. This design makes me think of a coloring book :)
For this mani I used two coats of WnW French White Creme. I stamped the designs using WnW Black Creme. The designs are from MASH set M20 and M60 as well as from Fauxnad plate B21. I then used the four art deco polishes pictured above to fill in the designs using my smallest nail brush. I topped the whole thing with SV as usual.
Springing to life...
I love that everything is turning green again so I decided to do a mani that was inspired by all of the green and everything blooming! I have had this green for a while and have been wanting to try it so badly. It turned out to be such a pretty green! I am such a sucker for green nail polish!! Also I probably will not be doing my nails for a couple of days because this stuff is not chipping! I did this design on Sunday. These pictures were taken Monday after working at the daycare all day and they are still not chipped today after working :)
This is outside in the sunlight:
Inside under the lamp:
I used some of my new stuff and added little flower buds to this design:
For this mani I used 3 coats of Petites Color Fever in Daze then I stamped both designs in WnW Black Creme from plate BM-225. The pink is from my new nail pens that I will get to tomorrow! Hope the weather where you are is as beautiful as it is here today :)
Posted by
lili
Labels:
BM-225,
Nail Art,
Petites,
Stamping,
Wet N Wild
This is for you MOM!!
This post and this mani is dedicated to my amazing mom!! These nails are perfect for my mom because they are kind of crazy and my mom is also kind of crazy in a good way. My mom is the mom who listens to rock and roll and drives around in her cute little convertible. My mom is the mom that is obsessed with shoes and necklaces. My mom is my shopping partner. My mom is also obsessed with nail polish and enables my nail polish addiction! My mom is the mom who will support me in what ever I do! My mom is the coolest person I know. My mom is my best friend! I love my mom!! Happy Mothers Day Mom!!!
I bought my mom the new set of Bundle Monster plates for Mothers day and this skull stamp was the one she was most excited to use so these are for her!
For this mani I used WnW Dreamy Poppy. I then used my new Bundle Monster plate BM-225 to stamp the skull and bones. I then used Sally Hansen Insta Dri in Lickety-Split Lime to stamp the green stars. Then I stamped the white stars on my ring finger using Sally Hansen Insta Dri in Whirlwind White. Then a generous coat of SV to finish it off.
Mom I know you look at my blog everyday so I hope you like this!
Happy Mothers Day!
I hope all of you moms out there are having a wonderful day!
I bought my mom the new set of Bundle Monster plates for Mothers day and this skull stamp was the one she was most excited to use so these are for her!
For this mani I used WnW Dreamy Poppy. I then used my new Bundle Monster plate BM-225 to stamp the skull and bones. I then used Sally Hansen Insta Dri in Lickety-Split Lime to stamp the green stars. Then I stamped the white stars on my ring finger using Sally Hansen Insta Dri in Whirlwind White. Then a generous coat of SV to finish it off.
Mom I know you look at my blog everyday so I hope you like this!
Happy Mothers Day!
I hope all of you moms out there are having a wonderful day!
Posted by
lili
Labels:
BM-225,
Bundle Monster,
Nail Art,
Sally Hansen Insta-Dri,
Stamping,
Wet N Wild
WnW Haul
Hey everyone, sorry that it has been a couple of day since my last post. My computer power cord decided to stop working on Thursday. Since I couldn't use my computer I have been busy doing my nails and some tutorials that I will post in the next couple of days. Last week or the week before WnW nail polish was on sale for 40% off at Riteaide!! Each of these polishes was 58 cents!! Seriously can't beat the price!! So I pretty much bought every color :) Here they are:
Above: Night Prowl. Eggplant Frost, Wild Card, Rain Check, Mauve Frost
Above: Sunny Side Up, Blazed, Dreamy Poppy, No name on this one, Casting CallAbove: Black Creme, Caribbean Frost, Toss me a LIFESAVERS
I really like these polishes!! If you would like to see any swatches of these let me know.
Posted by
lili
Labels:
Haul,
Wet N Wild
New Marbling Technique
I saw a picture of nails on another blog that were marbled using a needle. I decided to go ahead and try it because it looked so pretty and it was something new. I applied my base color which was WnW French White Creme on one nail and then immediately put 1 drop of WnW Caribbean Frost. I then quickly put another drop of polish in the center of the first dot, this time I used Pure Ice Wild Thing. Then using a needle I pulled the green up into the white over and over creating small swirls. I then pulled some of the white polish into the green to give more contrast. It took me about 3 nails until I got the hang of it. Next time I do this type of design I will create a tutorial but for now if you are going to try this I have some important tips:
- Do not use a quick dry polish because it will not work (I tried)
- Only do one nail at a time so the polish does not dry
- I used the sharp end of the needle but if you want thicker swirls the other end works too
- Use small drops of polish otherwise you will just flood your nail
- This technique gets a little messy so make sure you have a good cleanup method
- Most importantly you have to be quick and marble the colors before any of the polish dries
- Be creative, practice and don't give up!
If you have any question about how to do this I will be happy to help!
Posted by
lili
Labels:
Nail Art,
Needle Marbling,
Pure Ice,
Wet N Wild
Wet Cement and Butterflies
I did this mani yesterday morning and since then my boyfriend and I have been doing tons of spring cleaning so unfortunately this mani did not last long and is all chipped already :( While at Riteaid a couple days ago I picked up some more polishes. Yes I bought more and yes I need to stop. I couldn't help it because they were on sale but I will get to all of that in tomorrows post! Sally Hansen Xtreme Wear Wet Cement was one of the colors that I picked up because I did not have a nice grey. I ended up really liking this color. As all of the Xtreme Wear polishes it goes on smooth and dries pretty quickly.
Here is a pic of Wet Cement by itself:
Then of course I had to stamp it because polish all by itself is boring to me.
Natural light:
In the light box:
For this mani I used 2 coats of Wet Cement. I then stamped on the black flower design using plate M73 from the MASH set and Wet n Wild Black Creme. I then stamped the butterfly from M20 of the MASH set using Sally Hansen Insta-Dri in Whirlwind White. I topped the whole thing with a coat of SV.
On a little side note Black Creme is the best black that I have found for stamping! It goes on so dark and is really thick and creamy!! Also I got it at Biglots for $1 which makes it even better! The Insta-Dri polishes work very well for stamping but you have to be very quick or it will dry on the plate or on the stamper and won't transfer correctly to the nail. I am going to start a page about polishes that work well for stamping so if you have any polishes that work very well for stamping please let me know so I can add it to the list.
Thanks for stopping by!
Posted by
lili
Labels:
M20,
M73,
MASH,
Nail Art,
Sally Hansen Insta-Dri,
Sally Hansen Xtreme wear,
Stamping,
Wet N Wild
Swatches from latest haul
I was asked to do swatches of these two polishes and here they are!!
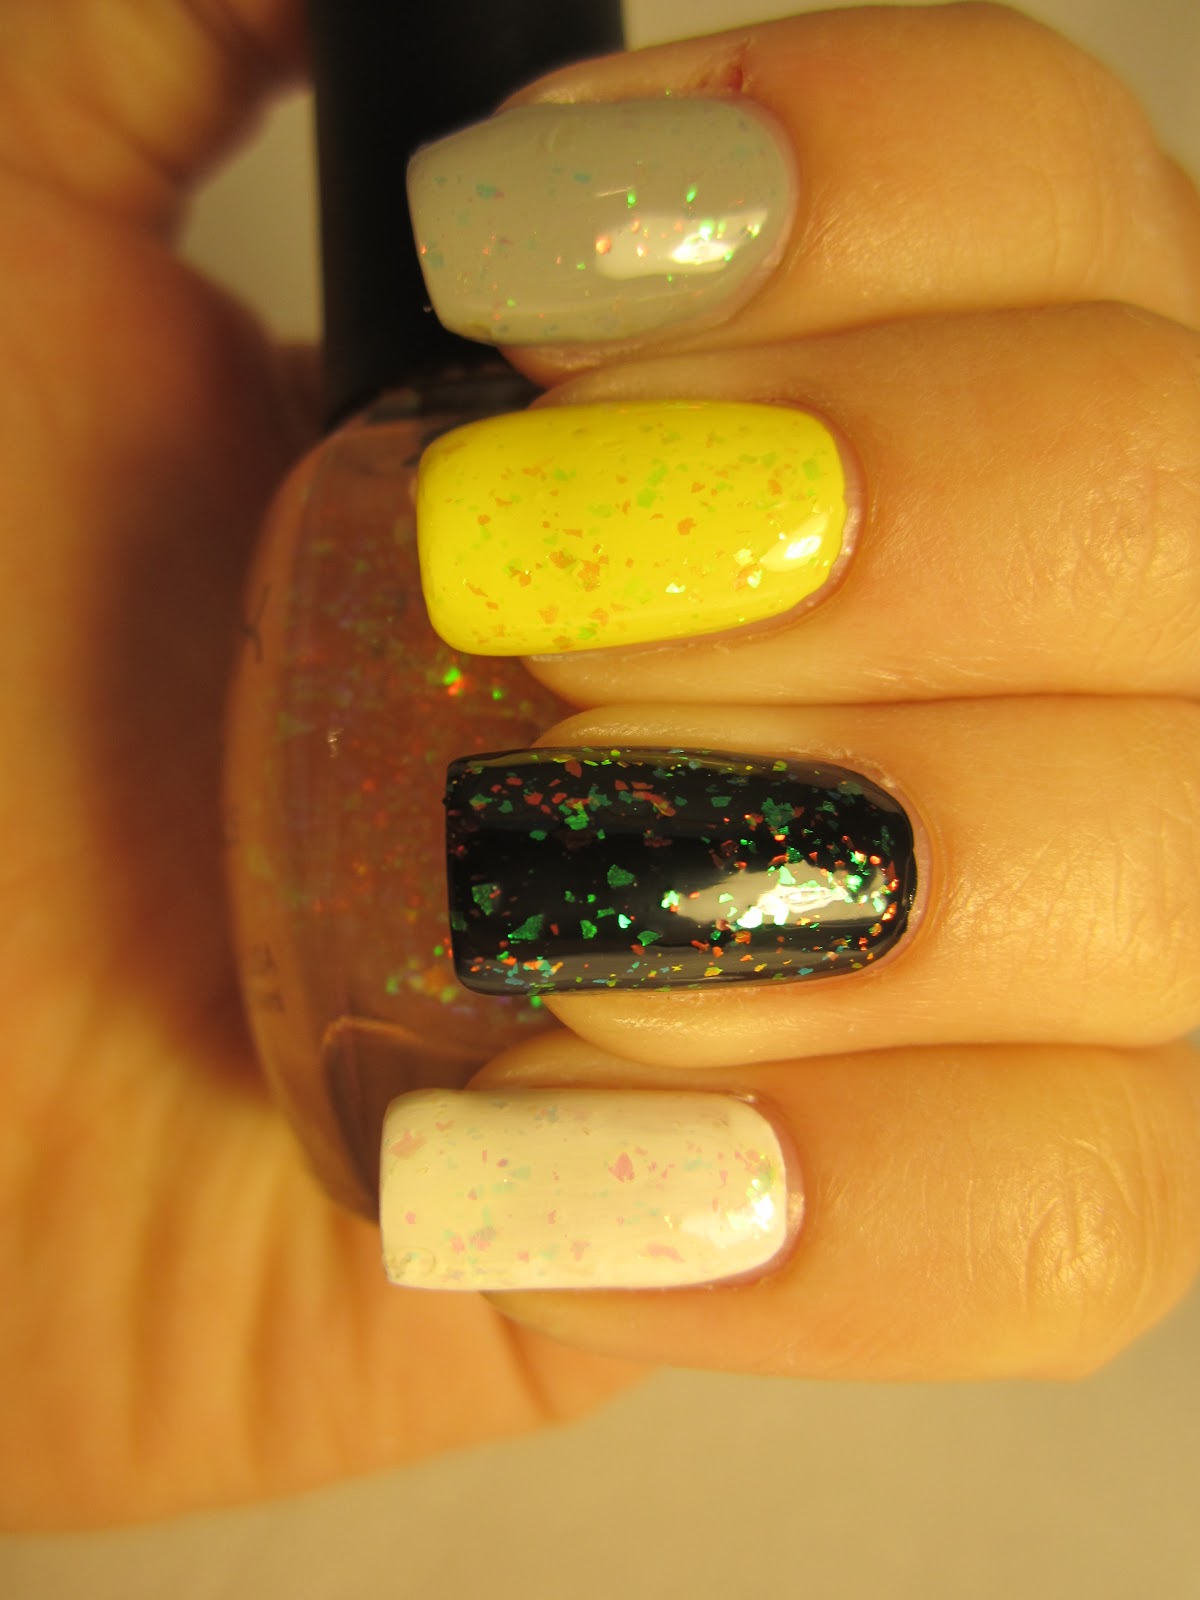
The first one is NYX Pink Ave. This is a flakie polish but the name makes so sense because it is not really pink. If you get it in the right light it will reflect pink and green but it still looks yellow in the bottle (pic in the haul post) I tried this polish over several different colors. In my opinion it looks best over black because it is the most noticeable. The grey is Sally Hansen Xtreme wear Wet Cement, the yellow is Sally Hansen Xtreme wear Mellow Yellow, the black is Wet n Wild Black Creme, and the white is Sally Hansen Insta-Dri Whirlwind white. They all were topped with 2 coats of Pink Ave. Which is your favorite?
Oh and please excuse the chunk missing from my index finger :( ouch
The first one is NYX Pink Ave. This is a flakie polish but the name makes so sense because it is not really pink. If you get it in the right light it will reflect pink and green but it still looks yellow in the bottle (pic in the haul post) I tried this polish over several different colors. In my opinion it looks best over black because it is the most noticeable. The grey is Sally Hansen Xtreme wear Wet Cement, the yellow is Sally Hansen Xtreme wear Mellow Yellow, the black is Wet n Wild Black Creme, and the white is Sally Hansen Insta-Dri Whirlwind white. They all were topped with 2 coats of Pink Ave. Which is your favorite?
Oh and please excuse the chunk missing from my index finger :( ouch
The second color is NYX Girls Gemma. This is such a pretty green! This color does confuse me a bit though. The polish goes on like a jelly and looks like a jelly until you put the second coat on. I feel like it doesn't look as much like a jelly now. I wouldn't however call this a creme... Maybe it is a creamy jelly lol. What is your opinion on this one, jelly or not?
Thanks for looking and happy Saturday :)
Posted by
lili
Labels:
Flakies,
NYX,
Sally Hansen Insta-Dri,
Swatches,
Wet N Wild
Foil crackle look
A while back I got a bunch of foils and I play with them here and there but I was never able to get the foil to completely transfer on to the nail were it looked good. I kinda gave up until I saw a post and video tutorial by the master of nail art Robin Moses if you don't know about her you need to go to her blog and YouTube channel now! She sometimes uses foils in her design and has testing many different glues and finally found a good foil glue. When I seen that I immediately started searching for The best glue ever (that's actually the name of it lol) I unfortunately didn't find it and I had to order it on overstock.com but it was ok because they have free shipping.
I finally got my bottle today and I wanted to try doing a design Robin did on her blog that didn't seem too difficult its a crackle polish technique which is basically using different color foils to look like crackle polish over a black polish.
For my version of design I used Wet N Wild black, Multi colored foil, China Glaze fairy dust, neon yellow and orange paint. I love this design it is now my favorite mani!
Have you ladies tried foils before? If so what kind of glue do you use?
I finally got my bottle today and I wanted to try doing a design Robin did on her blog that didn't seem too difficult its a crackle polish technique which is basically using different color foils to look like crackle polish over a black polish.
For my version of design I used Wet N Wild black, Multi colored foil, China Glaze fairy dust, neon yellow and orange paint. I love this design it is now my favorite mani!
Have you ladies tried foils before? If so what kind of glue do you use?
Posted by
lili
Labels:
Best Glue Ever,
China Glaze,
Foils,
Robin Moses,
Wet N Wild