Showing posts with label holiday. Show all posts

Nail Love

Hello there, neglected little nail art blog. Did you miss me? I've been doing my nails, but most of January was spent getting my latest book, Desert Heat up for sale, and writing up a storm on new books. And I'll admit that this month, I've been incredibly lazy about photo editing. But no more!

To get back into things, a simple Valentine's Day manicure...
 I started with a base of Avon's "Pink Radiance", just 2 coats over Seche Vite base coat.

Then I used my handy-dandy dotting tool from Born Pretty Store to dot a big heart on each nail in white. 

And that's it - two coats of Seche Vite top coat, and clean up. Unfortunately I've got a little tip-pull going on, but it's my own fault for not doing the undersides of my nails. Voila! Simple, casual Valentine's Day nails. 

Until next week (no, really!), happy polishing...

Catchin' Up

Apologies for disappearing in December - the holidays sort of got away from me. So today I have a couple finished manicures from Christmas and the first week in January to show you, and then next week I'll have a new tutorial to post.

For Christmas this year, I used these cute decals from Born Pretty. Speaking of which, Born Pretty has offered Nail Art Tuesday shoppers 10% off your order when you use code: SQUOVAL15 at checkout.


The fun part about the Christmas mani (aside from those lovely water decals) was that my silver polish was way too thick. It was hard to work with, but it also made a 3-D, almost "fuzzy" line at the tips.

Last week I got some fun new Finger Paints polishes that I can't recall the names of just now (don't worry, you'll see them again). I decided to do a gradient with China Glaze "Tinsel" between the white and purple. I love how it turned out, very "winter whimsical", I think.

So that's what I've been up to polish-wise - next week, China Glaze "Dorthy Who?" and full nail stickers.

Until then - happy polishing!

Sparkly Ornaments

This week, I needed something to help me get in the mood for Christmas, and I needed a quick design. So I got out these huge rhinestones that the Born Pretty store sent for review. I think they look very much like shiny glass ornaments, don't you?
I started with one of my favorite Christmas glitters, China Glaze "Emerald Sparkle". Two coats over CG base coat makes a nice "tree" layer.
Then I added a thick diagonal stripe in China Glaze "Tinsel", another of my favorite CG polishes. Just one, somewhat thick coat worked fine for setting the stones.
I added three stones to each nail, using red and yellow...
And switched the colors on my index fingers for just a little variety.
Two coats China Glaze quick dry top coat, some clean up, and voila! Sparkly ornaments telling me it's time to get moving on the holiday stuff.
**Edited to add - Born Pretty Store is offering a 10% discount until December 31st, 2010 - use coupon code OPENTENOFF. I may just do that myself, actually. :-)

I'm kind of itching to try a peppermint swirl water marble thing - perhaps I'll do that next week. Until then, happy polishing!

Red, White and Bling

Apologies for posting late this week - but I wanted to have a patriotic design to share in honor of our July 4th Independence Day celebration here in the states. Not just any red, white and blue though...I decided to get a bit more creative this year. I like 'em. :-)

I started with three coats of China Glaze "Snow Me White" - it took that many coats to get it smooth.
Then I did red stripes in Urban Decay's "Fbomb" - which is both ironic and kind of irreverent, but it was the perfect color, I think.
After that, a thicker stripe of blue straight down the center. Two coats of Zoya's "Kotori", one of my favorite sparkly blues.
Obviously, my edges leave a lot to be desired. To straighten them out and add some definition, I used my silver glitter Art Club striper to line the blue.
But wait, there's more! Finally, I put clear rhinestones down the blue, loosely representative of the stars on our flag. I set them in a coat of Seche Vite topcoat.
Then I added two more light coats of Seche Vite to seal, and cleaned 'em up the next morning. I think they're kind of edgy and fun, and they're definitely different than my normal 4th of July designs.
I hope you all have a wonderful holiday weekend - stay safe. Next week, it's all about the green, and stencils!

Until then, Happy Polishing...

Valentine Couture

I've had this design in my head for a week now, and it came out pretty close to what I'd envisioned. I thought I'd just keep it simple this week for my Valentine's Day Manicure.

I started with 2 coats of OPI DS "Couture" - a dark pink holographic color that I just adore. 

 
Then I used my white Migi Nail Art pen to put lattice on my thumbs, and white hearts on each finger. FYI, I found it was actually easier to do the hearts on my left hand upside down. Odd, but it worked. 
  
Then I put pearlized 3D hearts in the center of each white heart to finish them off. I was pretty happy that those hearts almost perfectly matched the base polish.
  
Two coats of top coat, some clean up, and here's what they look like in the daylight (all others above at night w/flash).
 
Super simple and subtle, but blingy in the sunlight! I do love this Couture color - I'd forgotten it was in my collection.

I'm not sure what's up for next week...any suggestions?

Happy polishing - and Happy Valentine's Day! :-)

Sparkly New Year

I'm not sure why, but I always associate sparkles and blue nail polish with New Years. Last year I wore China Glaze "Blue Island Iced Tea", and this year decided to go with something super-blingy, China Glaze "Luna". I used three coats to get complete coverage - two would have worked for shorter nails, but wouldn't quite hide the tips.


I used clear rhinestones randomly set in my thumbnails to give them an little extra sparkle. Then I added the year to the remaining four fingers on both hands - one in dark blue rhinestones, the other in white pearls (I never seem to have enough of one color to do all ten nails, do I?).

These are all set in one coat of top coat. For some reason, I had a hard time getting the top coat even again - and I added "renew" drops to it. Weird. My apologies for the somewhat blurry photos - my hands were shaky, and the glitter doesn't help. Yes, I know I have one too many rhinestones in the dark blue "1". That's what I get for rushing...

Then some clean-up work, and voila! Sparkly nails to announce the new year.


What are you wearing on your tips for the new year?

Next week, I'm going to let my nails rest without polish. I try to do that at least once or twice a year - seems like it would be good for them. So I'll post my manicure routine here instead of a nail art tutorial next Tuesday.

Here's a toast to you, dear readers - for a wonderful start to the New Year, much happiness and lovely nails in the coming months. See you in 2010!

All Wrapped Up

This week, I needed something quick due to switching my manicure days around. So I decided to "wrap up" my nails in festive China Glaze "Emerald Sparkle", with some little red bows I found in my nail art stuff. This is a super-quick manicure, if you're looking for something speedy.

First step - two coats of Emerald Sparkle over one coat of base:
Then I used a silver Stripe-rite nail art brush to slip a "ribbon" down the center of each nail. Normally I would offset this to the side a little, but the bows are largish, and my nails are very curved, so they work best in the center to make sure the edges seal down. It's annoying getting stones of any shape caught in clothing, hair, etc.
Then another silver "ribbon" across the first:
So there are little ribbon crosses on each nail, like a ribbon on a package.
Any embellishment will work for the next step - one year I did red nails, white stripes and little clay peppermints at the intersection. I used these cute red bow-shaped stones, one in the center of each intersection, set in top coat.
Two coats of top coat over the whole thing to seal, and clean 'em up!
Voila! A neatly wrapped tip for each finger.

What's on your tips this week? Anything festive?

Holly Jolly Manicure

This week I decided to try for Holly leaves. I've done them once before, but used a nail art striper brush rather than the Migi Nail Art pens that I used this time. Think I could use a little more practice, but overall, they ended up pretty festive.

I started with two coats of China Glaze "White Out" for the base color. I have a hard time getting this one even, but didn't worry too much about it since the next step was glitter.

Then I layered a coat of China Glaze "Glacier" over the top, for a nice glitter effect. Unfortunately, it didn't quite fill that uneven spot on my middle finger, but I like the overall frosty effect.
I decided to use black to outline the leaves after trying one in just green on my thumb. I did the outlines on each nail - it's a good idea to practice drawing holly leaves on a piece of paper first (just six "smiles" joined together at angles, three on each side).
Then I used the green migi pen to fill in the holly leaves.
For a little interest, I used a Nubar nail art pen to put a gold "ribbon" across the smile line.
And then three red rhinestones for berries in the center of each pair of leaves.
A few coats of top coat, some clean up, and voila! A Holly Jolly Manicure.
Admittedly I need more practice with the holly, but I like these quite a bit. Anyone else wearing holiday nails yet?

Happy Polishing!

Candy Cane Stripes

First, my apologies for the lack of post last week. Crazy happenings all over the place, and I never got a chance to post. This week starts the Christmas season though, and four weeks of holiday manicures, which I'm actually looking forward to this year (as opposed to being "not ready" just yet). I decided to kick the month off with some reverse candy cane stripes. I couldn't quite make up my mind on the tips, so you'll see where I changed my mind mid-polish further down.

I used the China Glaze "Ruby Pumps" and "Tinsel" to start, along with my white Migi Nail Art Pen, and some silver bouillon beads.

I started with a base of 2 coats Ruby Pumps (over Zoya basecoat).
Then I attempted to "sugar" the tips with Tinsel. I didn't get the polish thin enough, unfortunately, so ended up with more silver color than I'd hoped.
Then I drew on some diagonal white stripes on the main part of my nails with the nail art pen - obviously, I'm not a perfectionist, but I think they turned out okay.
I couldn't decide whether to define the tips with a line or not, so I tried black on my thumb. Too harsh, I decided.
Silver beads didn't tone it down enough, so I decided to skip the line altogether on my other nails.
I laid them in top coat on my other nails. Tip - do one half of the nail at a time, that way the top coat won't dry before you get all the way across the nail. I defined the tips with silver beads, then took stock. Decided I didn't really like the silver tips with all the other stuff going on - just too much.
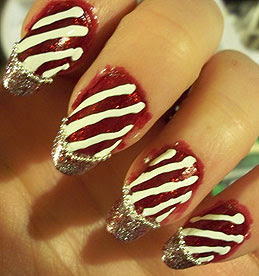
So back to red for the tips. Much better, I think. Right about here I was wishing I had some white faux fur to use in place of the silver beads - don't you think that would be cute as a sort of "cuff" for the tips?
A few coats of top coat, some clean up, and voila - shiny, glittery candy nails.
My right hand, blurry, but looking pretty good.
Next week, another holiday themed mani - what are you wearing on your nails this week?