When I ordered from Adell at Nail Art Delights last spring, she was generous to include a free roll of nail foil, and a bottle of adhesive. I've been meaning to try them all summer, and last week, when my index fingernail broke off below the tip of my finger (meaning I had to cut all my nails way short to match), it seemed like the perfect time. If you haven't tried foils before, they're super-fun and easy...but I'm hoping those of you who have tried them can help me - see the end of the post.
First, photos of my poor broken index nail. For some reason, my nails always seem to break off *below* the tip of my finger, so I can't actually do much about the cut until the nail grows out. Here's the difference in length after I cut my index nail down:
*sigh* And here are my poor nails after being hacked off. I've always been very sensitive about my fingernail length for some reason. When I was in elementary school and was made to cut them super-short for piano lessons, I cried. Seriously.
You can see the break there. Painful stuff. Don't mind the roughed up surfaces there - I'd just filed and buffed the tops to prep for polish.
So I started with 2 coats of China Glaze "Blue Island Iced Tea" - one of my favorite sparkly blues.
Pretty, yes? After the polish is dry, it's time to apply the adhesive. It only takes a thin coat, and you have to let it dry until it's just tacky on the nail (I lost my instructions, so if this is wrong, someone correct me, please). You can do designs, or stripes, or whatever - the foil will only stick to the adhesive. When it's tacky but dry-ish, it's time to foil. As you can see, the foil has two sides - the side you can see the design on, and a brown side:
The brown side goes on your nail. You can cut it, but I'm too lazy - I just start at the end, and press a section to the prepared nail. You can use a cotton ball, I just used an orange stick to smooth the foil over the nail surface, and make sure it makes good contact with the adhesive.
Then you just pull the leftover clear plastic off, and voila! Pretty foil on your nail.
Here's what four looked like, and to the left you can see the used foil paper. If you miss a spot, dab a little adhesive on and let it dry, then just use one of the smaller unused bits still on the backing. Super-easy.
So here's my problem. When I tried to put China Glaze top coat over it, the foil smeared. Zoya worked slightly better, but still tore the foil. Any foil mavens out there? What do you use to seal your foil designs?
I ended up having to redo these the next day - foil has no staying power without some sort of protection. I have *plenty* left though, and will be ordering more, so stay tuned for more of this technique later.
Next week - glittery gold and rhinestones. Until then, Happy Polishing!
Showing posts with label foils. Show all posts
Tempest Foils
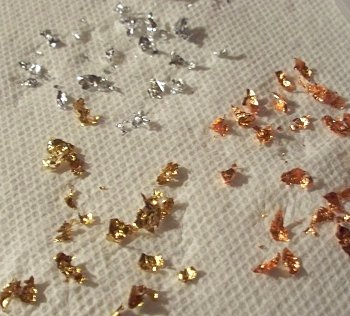
Yesterday I released my first self-published book - Tempest, a romantic suspense novella. Naturally, I was tickled to find China Glaze "Tempest" at the beauty supply store last weekend, and simply had to have it! I decided to add foil patches for an extra bit of chaos...and aside from the tip-pull issues, I think it turned out quite nicely. I have three colors of foil - copper, gold, and silver. They come in squares:
I basically just shred the squares with two orange sticks until I have different sized pieces. Wrinkles are good, in my opinion.
It took three coats of "Tempest" to be opaque...beautiful color, I think.
Then one nail at a time, I put a coat of top coat, and stuck bits of foil onto each nail. To pick up the foil, I licked the end of an orange stick and touched it to the foil. Just avoid getting top coat on your tongue. Trust me.
I sealed the designs with two coats of top coat (I used China Glaze base and top coat for this mani), and then cleaned up the mess this morning.
Oh look! A picture of my nails and my book! ;-)
If you'd like to see what Tempest is all about and perhaps get a copy for yourself, head over to my web site for the blurb, sample chapters, and ordering links.
I'm about ready for fall colors - how about you? Next week, something in wine, I think...
Until then, happy polishing (and reading)!
I basically just shred the squares with two orange sticks until I have different sized pieces. Wrinkles are good, in my opinion.
It took three coats of "Tempest" to be opaque...beautiful color, I think.
Then one nail at a time, I put a coat of top coat, and stuck bits of foil onto each nail. To pick up the foil, I licked the end of an orange stick and touched it to the foil. Just avoid getting top coat on your tongue. Trust me.
I sealed the designs with two coats of top coat (I used China Glaze base and top coat for this mani), and then cleaned up the mess this morning.
Oh look! A picture of my nails and my book! ;-)
If you'd like to see what Tempest is all about and perhaps get a copy for yourself, head over to my web site for the blurb, sample chapters, and ordering links.
I'm about ready for fall colors - how about you? Next week, something in wine, I think...
Until then, happy polishing (and reading)!
Fall Foils
This week I decided I'd experiment with the copper and gold "nuggeting" I'd gotten awhile back. You may recall that these were included in my contest prizes as well. They're very thin sheets of foil that you pull apart into as large or small bits as you'd like with orange sticks, and then set in a layer of top coat. I would imagine you could do whole tips or maybe even the entire nail with it - I'll have to experiment with that later.I forgot to get a photo of the polish bottle this time - but this color just looks black in the bottle anyway. I started with 2 coats of OPI's "Here Today, Aragon Tomorrow" for the base color. It's a super-dark green, more like black with a green tint, really. To see the green, you really need a flash or bright sunlight.
Applying the foil is super-easy, especially if you're just going for random abstract art like I was. I laid down a coat of top coat, then picked up pieces of foil with the moistened tip of an orange stick, and spread it out on the nail. I didn't worry about wrinkles in the foil - personally, I think they add texture and interest, but I suppose if you had a really light touch you could smooth it out pretty well.
After I put random bits of copper and gold foil on each nail, I sealed it over with two more coats of top coat, and voila! That was it. Very easy and quick.
Finished and clean with a flash (above).
Complete without a flash.I like the foils quite a bit, and can see using them a lot, maybe even for defined shapes if I can figure out how to cut them out without tearing the design.
Yes, I know my cuticles are in bad, bad shape right now. They got that way over Halloween with all the decor and outdoor labor, and the air is so dry right now my skin is rather more like alligator hide. I'm planning to get my paraffin bath out of the closet again next weekend (got put away to leave room for decor), and try to get my hands/feet back into better shape again.
Next week, a Thanksgiving manicure, of course!
Happy polishing...