Showing posts with label tutorial. Show all posts

Spice Up Your Blogs, Shops and More...

by MaryAnn Carroll

Hmmmm......what to write about?  Well, I was going to talk about the upcoming wood-firing by my husband Bill who will graciously save some room for my beads in this quarterly adventure.  I think I'll save that for next week when I hope I can display some gorgeous beads that come from the kiln!! 

Instead, I have been sharing a tutorial that I put together quite some time ago with various people lately.  In the past, I've shared this with Beads-of-Clay and Totally Tutorials as well.  I thought that those of you who have blogs, Etsy or Artfire, etc. shops, websites or would like to make some of your own interesting display signs for your shows, etc. this might come in handy.  I use it all the time.  I'm sure that there are other programs which will do something similiar and perhaps, even more sophisticated, but this is what I use.  It's fast and easy to do.  As a matter of fact, I just created a Free Shipping banner on my Etsy shop just 15 minutes before this post. 

This is a VERY simple way that I go about making a banners, picture gadgets, etc. This one was done on my PC....  I've used it to make picture collages like you see on our Love My Art Jewelry website homepage.

First, you need to open a new blank document in MicroSoft Word.

1. Along the top banner, you should see options for selecting various "tools." Click (insert shape). Look down to the bottom for a choice called (New drawing canvas).....select that. In the example below, I have shaded in what it will look like. The initial "drawing canvas" will be white.

Example 1: Drawing Canvas that has been "filled" with color
2. You will now have a box that has some black dash like outlines as shown above. This is the box that you will be adding pictures/wordart, etc. to This will be your "DRAWING CANVAS" and you will work within this. Each addition (pictures/wordart, etc.) also have their own capabilities within the box until your project is completed. For example, you can resize them, drag them around, etc. In the example below, you would be able to drag the rabbit picture around, add outline colors, etc.

Example 2: Blank Drawing Canvas with 1 picture inserted.
3. When you add different parts (picture, etc.) to it, I would typically work with it OUTSIDE of the drawing canvas first. I first format it by selecting "TEXT WRAPPING" on the tool bar and then select "TIGHT" so that I can move it around easier. I then cut and paste it into the main box. *NOTE: When inserting anything into the DRAWING CANVAS you must have only the outside lines showing as in Example 1.

4. Once you have everything where you want it, you can drag the outside black lines in where you want them (for size), you would click it and cut. **Make sure that the only thing showing when you select are the black outside lines...not the pictures.wordart, etc. that are separate parts inside the text box.

**Think of those parts like the parts you add to a collage. They can be moved and manipulated until they are glued into place. When you pick up the collage, the entire piece goes with you.**

Example 3: Drawing canvas after I formated the picture border of the rabbit and the Drawing Canvas. I also inserted WordArt
If you select the banner that you made correctly, the entire banner should cut (not copy) from the document.


5. Paste it in your Microsoft Clip Organizer (NECESSARY STEP). If you don't know where that is, just search it where your programs are (lower left corner of computer). Once it has been pasted in the Clip Organizer, you can copy from that and paste it in your picture file. Now, it is no longer a Word Document. It is a picture.

**You might want to go back to your document and undo the cut and save it so that you have a template for future banners.

6. At that point you would size it, etc. like you would any picture.

Example 4: Finished Banner. When uploading a "Gadget" on your blog, pick the "Picture" option.
You will then be able to upload this and link it as you wish.

This one has been linked to Nancy's "All Handmade" bead and jewelry shop Round Rabbit on Etsy.
Composition and Loomis PDF's!

Hey everybody! Updating this a little bit later than usual. Devin and I spent the time after the Crimson Daggers and built an awesome monster snow man out back. Its pretty huge, somethin over 6 feet, just wait til I don't show you and it rots in the backyard... Withering away as the glory of spring destroys his monster heart D:.


Check the stream tomorrow 


@6pm EST for my Monday night Character Drawing Session! 


I'll be taking suggestions from the Chat and it will dictate how the final character comes out!

Anyways heres some of the content we covered during the stream today... Basically a lot of technical questions came up and we often referred to sources online from which we learned. Hopefully you'll give these a read through and learn somethin useful!

Composition! - Be sure to READ through ALL to absorb it!

LandScape Composition Rules! - Applies to all images though... 

Phil Straub's Composition Tutorial 

Fundamentals of Composition!

Hue Value Chroma! - Very important information! It is a very boring read but I would advise you really take the time to check it out.


HueValueChroma.com

Loomis PDF's! everybody seems to be looking for these... Download them here(right click - 'save link as' to save to the computer)!


Loomis PDFs!

Other than that I don't have much else to post. Not quite done with my study just yet but I'll try and update when I can :). Hope all that info helps! Keep on studying and seeee my daggers tomorrow!

And as always I got the other supplies I mentioned like the Plaster Cast I was studying today in the sidebar to the right here ---------------->

Metal! - W.A.S.P. - "Wild Child"

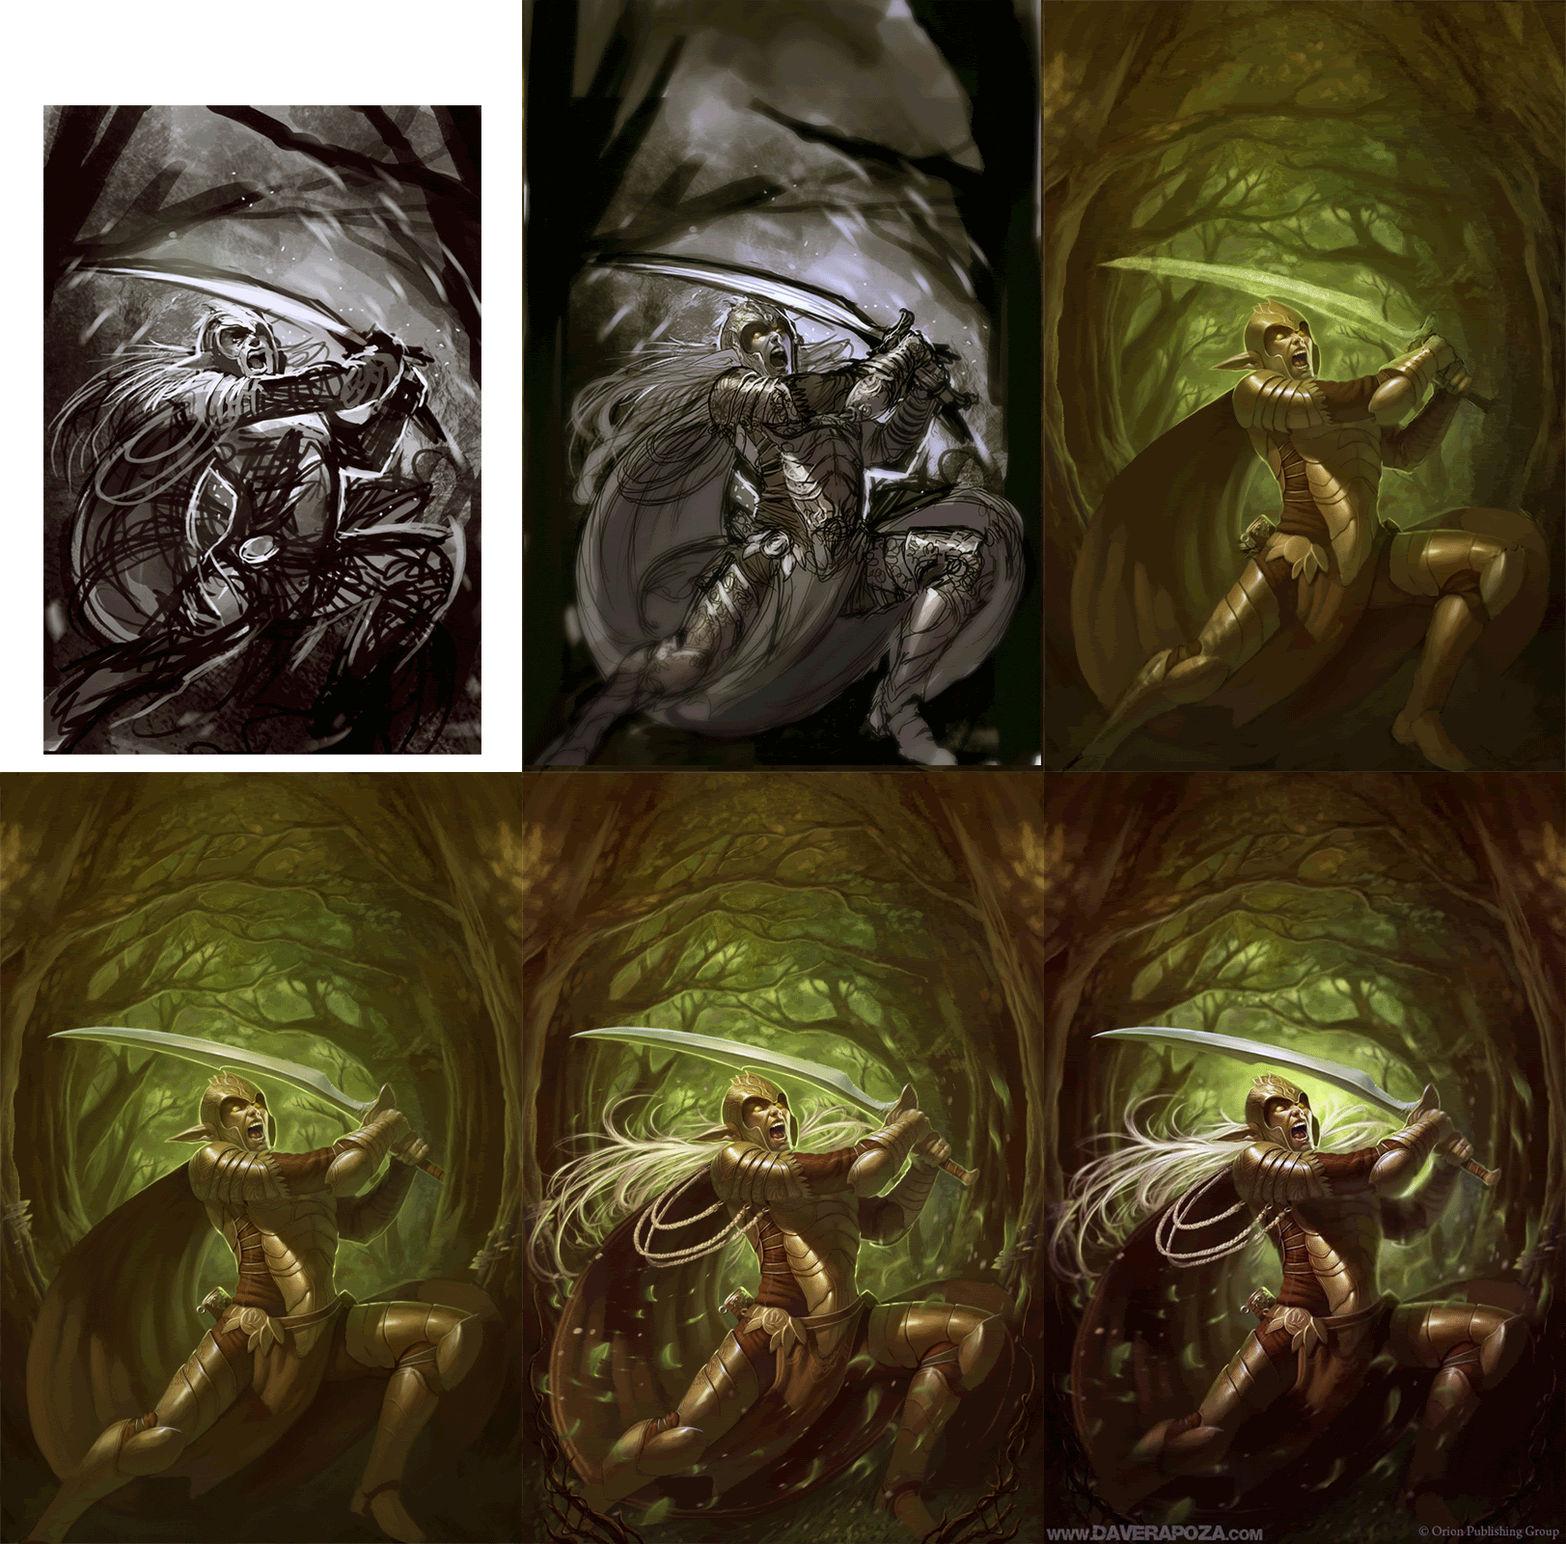
Elves Cover Process

Hey everybody! Heres a quick little process Gif I made of my Elves cover.

Basically its just - Sketch - Lines - Tones - Color Render until polished :D. Hope it helps a little!

(click to enlarge)


And heres some other work!


Metal! - Inherent Sin - "Gates of Hell"


Creating Sketchin Brush - Skype Reviews?

Hey everybody! I got a few things to talk about today :). First off, things are finally flowin pretty good. The hard times I was talking about are pretty much over with! I'll be starting on my first set of Magic Cards at the end of the month and I'm really looking forward to it! Ever since I was 9 years old I've wanted to work on Magic so its been really awesome to finally have that dream realized. Not that its the ultimate goal for me but it was certainly on my list! I'm gonna put my everything into em and hopefully you'll see a lot more from me in the future :D.

Other than that I did up a new video on creating the custom sketchin brush I use in photoshop. This brush helped me a lot with my edges and whatnot so I hope you guys like it! Its a pretty standard custom brush that is simple and effective. My friend Devin Platts showed me how to make it a little while ago and I've been using it since.

Before you watch the video though I'd like some input... I was watching the Chiu stream(Bobby Chiu's live streaming thing) and he mentioned having people make Skype calls to ask questions to the people he was interviewing. So I was thinking that maybe I could get some of you guys to call me(or I could call other concept artists/illustrators as well) and we could either discuss certain aspects of art/freelance/the industry in general... Or I could go over your own work and screen capture critiques? You'd just need a mic and a skype account! Let me know what you guys think of that and I'll start brainstorming some ideas :).

Anyways! Heres the video!

Please click here and view in HD!


Metal! Armored Saint!


P.S. if you wanna know when updates are happenin on here you can always follow me on twitter as I always update on there when a post goes up.

Video Suggestions?

Well, I've been thinking a lot about what tutorial videos I could make... and I was having trouble coming up with anything very interesting. But since I've been into my own process so long I've probably lost sight of what I used to wish I knew. So I'm hoping that whoever checks out this blog has some questions about my process!


Just post a comment asking me what you'd like to see and I'll get to making a list of videos to make.


Thanks and look forward to hearing your suggestions!


Tormentor!


Grayscale to Color Video Tutorial

Hey everyone! I get a lot of questions about how I color my images annndd today I can hopefully address some of those. The video below is just somethin quick I made to show a basic process of adjusting the color on a grayscale image. This technique isn't for everybody... Mostly because you gotta be used to drawing straight grayscale and getting your values to a certain point. If you don't have much value range this approach doesn't work so well. But take from it what you can! I'm gonna get some sleep :D!

I've been looking at microphones online and found a few that seemed alright... As well as some decent editing program haha. I'd like to get more into making tutorials but just don't want to release a ton of crap quality ones. Hope you get somethin outta it at least :)!


and heres some metal... Slammer!