
 Posts
Posts


 Dude! I don't even know why I went to the store, but I can tell you I bought these things. Johnson and Johnson came out with mickey band-aids with some pretty dope packaging. I'm currently contemplating the idea of rolling over shards of glass just so I can bust these babies out.
Showing posts with label packaging. Show all posts
Showing posts with label packaging. Show all posts
Mickey?
Dude! I don't even know why I went to the store, but I can tell you I bought these things. Johnson and Johnson came out with mickey band-aids with some pretty dope packaging. I'm currently contemplating the idea of rolling over shards of glass just so I can bust these babies out.
It's all About Presentation : How to Make a Paper Box
Today I'm going to show you how to make a simple handmade box. It's the box that inspired last month's Art Spark challenge. I first encountered this box pattern when I received a beautiful piece of jewelry from the lovely and talented Lorelei Eurto which was packaged lovingly in a box just like this.
 For my boxes I purchased a couple of packages of scrapbooking card stock.
It is perfect because it is both beautiful and square.
Square is where we start with this project. You need two pieces of paper the same size, and perfectly square. The size of the paper determines the size of the box. I am illustrating with 12 x12 inch paper but if you quarter it, you end up with four boxes of petite size. (my favorite)
 This is all you need. Scissors and paper. Make sure the paper is stiff like card stock. It makes your box strong and your folds crisp.
 Choose two pieces of complementing paper. One will be the top and one will be the bottom of the box. Begin by removing any extra tabs that have been attached to the paper by the manufacturer.

**Please note -I have chosen two pieces of paper that are identical as one side of them is decorated and the other printed red.
 Choose the paper/color that you'd like to be the bottom.
If you are using 12 x12" size paper, trim 1/2" from two perpendicular sides.
 My finger is pointing to the crease you will make.

Showing two sides up. All four sides will come in to meet the center point, get creased and then fold out again.
 Once you have folded all sides in and then back out you will see a small crease-square in each corner of the arrangement.
Square is where we start with this project. You need two pieces of paper the same size, and perfectly square. The size of the paper determines the size of the box. I am illustrating with 12 x12 inch paper but if you quarter it, you end up with four boxes of petite size. (my favorite)
 This is all you need. Scissors and paper. Make sure the paper is stiff like card stock. It makes your box strong and your folds crisp.
 Choose two pieces of complementing paper. One will be the top and one will be the bottom of the box. Begin by removing any extra tabs that have been attached to the paper by the manufacturer.
**Please note -I have chosen two pieces of paper that are identical as one side of them is decorated and the other printed red.
 Choose the paper/color that you'd like to be the bottom.
If you are using 12 x12" size paper, trim 1/2" from two perpendicular sides.
The bottom of the box needs to be a bit smaller to fit inside the top when folded. I usually eyeball this but if you are making smaller boxes, trim a smaller amount proportionally.


Beautiful. You're doing great!
 Now the edges of the square get folded to the center 'X' point. Fold them in and flatten them back out again.
Next, with your chosen color for the bottom facing the table, fold the square into a triangle meeting opposite corners. Open the paper flat and fold the two other corners together. Make soft creases when you do this. You are making a guideline for the next step. Open your paper flat once more.
Above you will see the next step illustrated. Bring your four corners together into the middle using the nice 'X' you made in the center of the square.
Once every one is in, turn each one out to look like this:

Beautiful. You're doing great!
Now the edges of the square get folded to the center 'X' point. Fold them in and flatten them back out again.My finger is pointing to the crease you will make.
Showing two sides up. All four sides will come in to meet the center point, get creased and then fold out again.
 Once you have folded all sides in and then back out you will see a small crease-square in each corner of the arrangement.
 What you will do now is carefully cut two places on parallel sides of the work. You know when to stop cutting when you reach the crease-square's point. The point of the scissors above are in just the right place to stop.
 Now after four beautifully precise cuts, you have made this (above)

Open out the "short" sides like the unfolding wings of a bird ( I know, but it's late and it's a good visual)
 With the open wings flat on the table, lift the two "long" sides up and have their corners meet and overlap. (How do-you-do corner? Just fine, corner.)

Uh oh!

#2. Do the same with the other side.
TA DA!

 The top taking shape. Here we go again with the bird wings...

They enfold the two sides and..... BAM! A boxtop.
 Pefecto.
 Now after four beautifully precise cuts, you have made this (above)
Open out the "short" sides like the unfolding wings of a bird ( I know, but it's late and it's a good visual)
 With the open wings flat on the table, lift the two "long" sides up and have their corners meet and overlap. (How do-you-do corner? Just fine, corner.)
Uh oh!
The outside corner is too long and too pointy.
So we trim it. Just a bit, to make it even.
 You can see both parts of the next steps above.
 You can see both parts of the next steps above.
 #1. while holding the newly acquainted corners together, let that bird wing that we opened up earlier reach up and wrap around and over them to hold them together.
( hey, this metaphor's not too bad).
When you lay the corner in the box bottom, it will hold with friction. If you wanted a more permanent bond try a bit of glue or double sticky tape.
#2. Do the same with the other side.
TA DA!
You have just completed the bottom of the box.
Nice one.
Now for the top.
The pattern I would like on the top is now facing the table as I start folding. Repeat all steps the same as with the bottom.
Your top half will be a tiny bit bigger and should be able to slide down easily but with some resistance. If you think it's too loose or too tight, don't fret.
That ill-fitted box bottom is a great drawer organizer and you can make a new one by adjusting the width of the 1/2" strips that we trimmed from two sides of the bottom paper in the beginning.
 The top taking shape. Here we go again with the bird wings...
They enfold the two sides and..... BAM! A boxtop.
 Pefecto.
Gift Packaging: Little Touches = Big Magic
by Patty Lakinsmith
After being inspired by Erin's post on Art Bead Scene, I decided to give my Etsy packaging a mini-makeover for the holidays.
My normal packaging is pretty basic by design. Most of my choices are driven by the desire to be conscious of the environment, and to make sure the product arrives safely. From the inside out, I wrap the bead or jewelry in some kind of cushioning material (bubble wrap or a paper alternative - still working on that one), then a kraft paper gift box tied with a pink curling ribbon and wrapped in more cushioning, and inserted in a kraft envelope.
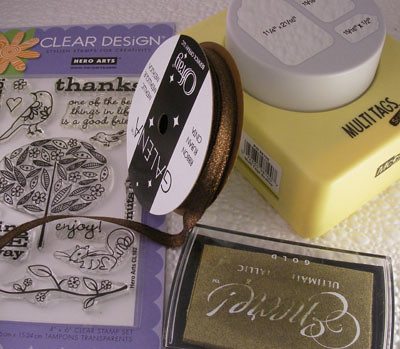
I don't have a logo or stickers yet, or any other fancy printed material, so I decided to go to the local craft store and make my own. I got some red card stock, a great die cutter that cuts paper in the shape of little gift tags, some clear rubber stamps, and some nice sparkly ribbon. I already had a stamp pad with gold ink.
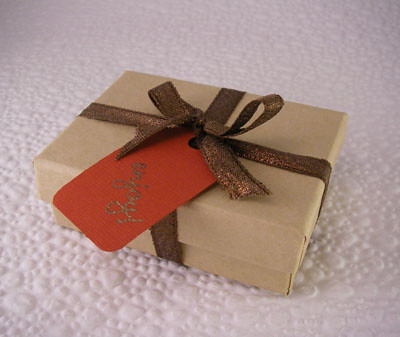
Here's my end result:
After being inspired by Erin's post on Art Bead Scene, I decided to give my Etsy packaging a mini-makeover for the holidays.
My normal packaging is pretty basic by design. Most of my choices are driven by the desire to be conscious of the environment, and to make sure the product arrives safely. From the inside out, I wrap the bead or jewelry in some kind of cushioning material (bubble wrap or a paper alternative - still working on that one), then a kraft paper gift box tied with a pink curling ribbon and wrapped in more cushioning, and inserted in a kraft envelope.
I don't have a logo or stickers yet, or any other fancy printed material, so I decided to go to the local craft store and make my own. I got some red card stock, a great die cutter that cuts paper in the shape of little gift tags, some clear rubber stamps, and some nice sparkly ribbon. I already had a stamp pad with gold ink.
Here's my end result:
Kind of simple, but definitely better dressed for the holidays, don't you think? I'm still wrapping this in bubble wrap and using the kraft envelope, but at least the interior part will be more attractive. I hope that my customers will like it.
Happy Solstice, everyone. It's only getting brighter from here on out.
Happy Solstice, everyone. It's only getting brighter from here on out.