Showing posts with label fancy. Show all posts

Catchin' Up

Apologies for disappearing in December - the holidays sort of got away from me. So today I have a couple finished manicures from Christmas and the first week in January to show you, and then next week I'll have a new tutorial to post.

For Christmas this year, I used these cute decals from Born Pretty. Speaking of which, Born Pretty has offered Nail Art Tuesday shoppers 10% off your order when you use code: SQUOVAL15 at checkout.


The fun part about the Christmas mani (aside from those lovely water decals) was that my silver polish was way too thick. It was hard to work with, but it also made a 3-D, almost "fuzzy" line at the tips.

Last week I got some fun new Finger Paints polishes that I can't recall the names of just now (don't worry, you'll see them again). I decided to do a gradient with China Glaze "Tinsel" between the white and purple. I love how it turned out, very "winter whimsical", I think.

So that's what I've been up to polish-wise - next week, China Glaze "Dorthy Who?" and full nail stickers.

Until then - happy polishing!

All About A Russian Party

I was trying to decide what to do this week, starting really late, and was super-tired. So I opted to try a gradient again, and had moderate results (mostly due to being really tired, I think). The colors I used are OPI's "Russian to a Party", a reddish maroon w/gold shimmer and Sinful Colors "All About You" - a sheer gold glitter.
To start, I layered two coats of RTAP over base coat.
Next I put a thin layer of glitter over 3/4 of each nail starting at the base.
Then another coat of glitter, stopping a half way up the nail:
And finally one more strip just up at the base of the nail.
Two coats of top coat and some clean-up finishes it off nicely. 
I got the glitter too thick in spots...next time I'll be more careful about that. It takes a light touch to get the gradient effect. I may actually try with one of the CND effects polishes next time. 

Born Pretty sent me some free stuff to review, including some fun black crackle polish. So next week, a tutorial on crackle polish - should be very cool, I think. Until then, happy polishing!

Coppery Fall

Apologies for disappearing, fellow nail art lovers. October kind of got away from me in a big way, and I dropped the ball here. But things are back to normal now, more or less and should be from here on out.  Ready for more nail art? Me too. :-)

Last week after all the Halloween hoopla, I decided a lighter fall manicure was in order. I started off with two coats of Zoya "Penny" over Zoya's Anchor base coat (above). Then I went over the tips with Zoya "Kalima", which is a gorgeous bright orange copper color. I really love these two polishes together...
You know I can't resist bling...so I dug out some yellow rhinestones, and outlined the smile line with them on my thumb, plus added one more to the tip. I decided the smile line was too much, so I just placed one stone in the point of the other nails. All stones were set in one coat Zoya Armor top coat.
Then I sealed it with two more coats of top coat, which you may note bubbled a bit. My top coat is old...I sense a nail supply order in my near future...
And voila! Simple coppery fall nails...super-simple and pretty subtle overall.

Next week, something darker under the last of my yellow rhinestones...until then, thanks for visiting and happy polishing!

Black Splats

My apologies for missing last week - I did a candy corn manicure I thought was an abject failure, though I got a ton of compliments on it. This week I was going to do orange "splats" on my black nails, but decided I liked this gold glitter instead. Unfortunately, it's insanely hard to photograph - which is too bad since I love how it turned out. 
I used stencils ordered from Nail Art Delights - these fun paint/blood splatter marks. 
Since I was originally going to use orange, I started by painting the undersides of my nails with Pure Ice orange for contrast. 
Then I did the tops with two coats China Glaze "Liquid Leather" over one coat China Glaze base coat. I love LL - the best shiny black out there, in my opinion. 
This is when I started experimenting. I had Sinful Colors "All About Me" on my manicure tray - it's a transparent gold glitter. I wanted to see what it looked like over the black, so I brushed a coat over my pinky nails. 
I wish it would photograph better - it looks almost brocade-like. So I decided to do my splats in that, and started with a coat of fast-dry top coat, and then secured a stencil over my thumbnail. 
Filled it with the gold glitter...
And pulled it off. A word of warning on these particular stencils. Due to the wide open spot in the center, it's hard to get these off without warping the design. Go slow, and don't just pull from one corner, pull evenly along a whole side. 
I finished the rest and sealed the design with two coats China Glaze top coat. I used one of the Avon nail art corrector pens for clean-up...the only problem I have with these is they run out too quickly. I need to play with the refillable style again. Here's a yellow photo that shows the design just a bit better: 
And one in regular light: 
Next week, I'm doing a glow-in-the-dark webs design for our annual Halloween party. Until then, happy polishing!


Blue Foils & Broken Nail

When I ordered from Adell at Nail Art Delights last spring, she was generous to include a free roll of nail foil, and a bottle of adhesive. I've been meaning to try them all summer, and last week, when my index fingernail broke off below the tip of my finger (meaning I had to cut all my nails way short to match), it seemed like the perfect time. If you haven't tried foils before, they're super-fun and easy...but I'm hoping those of you who have tried them can help me - see the end of the post.

First, photos of my poor broken index nail. For some reason, my nails always seem to break off *below* the tip of my finger, so I can't actually do much about the cut until the nail grows out. Here's the difference in length after I cut my index nail down:
*sigh* And here are my poor nails after being hacked off. I've always been very sensitive about my fingernail length for some reason. When I was in elementary school and was made to cut them super-short for piano lessons, I cried. Seriously.
You can see the break there. Painful stuff. Don't mind the roughed up surfaces there - I'd just filed and buffed the tops to prep for polish.

So I started with 2 coats of China Glaze "Blue Island Iced Tea" - one of my favorite sparkly blues.
Pretty, yes? After the polish is dry, it's time to apply the adhesive. It only takes a thin coat, and you have to let it dry until it's just tacky on the nail (I lost my instructions, so if this is wrong, someone correct me, please). You can do designs, or stripes, or whatever - the foil will only stick to the adhesive. When it's tacky but dry-ish, it's time to foil. As you can see, the foil has two sides - the side you can see the design on, and a brown side:
The brown side goes on your nail. You can cut it, but I'm too lazy - I just start at the end, and press a section to the prepared nail. You can use a cotton ball, I just used an orange stick to smooth the foil over the nail surface, and make sure it makes good contact with the adhesive.
Then you just pull the leftover clear plastic off, and voila! Pretty foil on your nail.
Here's what four looked like, and to the left you can see the used foil paper. If you miss a spot, dab a little adhesive on and let it dry, then just use one of the smaller unused bits still on the backing. Super-easy.
So here's my problem. When I tried to put China Glaze top coat over it, the foil smeared. Zoya worked slightly better, but still tore the foil. Any foil mavens out there? What do you use to seal your foil designs?

I ended up having to redo these the next day - foil has no staying power without some sort of protection. I have *plenty* left though, and will be ordering more, so stay tuned for more of this technique later.

Next week - glittery gold and rhinestones. Until then, Happy Polishing!

Revvv It Up

It's been raining for days. I'm not really a happy camper in the rain - gray, cold and wet is just not my thing. So I went with a dark charcoal color for the week, with rainbow mica embedded for those rare moments when the sun peeks out from behind the dark clouds. Naturally I added some rhinestone stickers for a little extra dimension.

I started with 2 coats of Color Club's "Revvvolution" over China Glaze base coat:
You can see all the pretty colors embedded with the flash. These normally aren't visible unless the lights hits the color just perfectly.

Then I took these lovely Cina nail art stickers - basically just rhinestones arranged on adhesive backs:
...and placed them simply on each nail.
Two coats of China Glaze top coat and clean-up, and voila. Very simple dark design that still pops.
With any luck, the rain will stop by next week, and I'll be ready for something brighter again. ;-)

Until then, happy polishing!

Tempest Foils

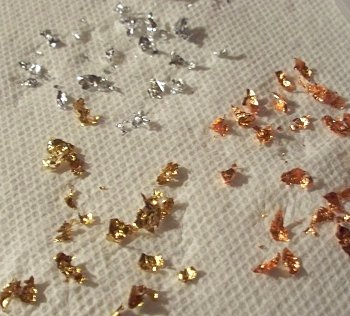
Yesterday I released my first self-published book - Tempest, a romantic suspense novella. Naturally, I was tickled to find China Glaze "Tempest" at the beauty supply store last weekend, and simply had to have it! I decided to add foil patches for an extra bit of chaos...and aside from the tip-pull issues, I think it turned out quite nicely. I have three colors of foil - copper, gold, and silver. They come in squares:

I basically just shred the squares with two orange sticks until I have different sized pieces. Wrinkles are good, in my opinion.
It took three coats of "Tempest" to be opaque...beautiful color, I think.
Then one nail at a time, I put a coat of top coat, and stuck bits of foil onto each nail. To pick up the foil, I licked the end of an orange stick and touched it to the foil. Just avoid getting top coat on your tongue. Trust me.
I sealed the designs with two coats of top coat (I used China Glaze base and top coat for this mani), and then cleaned up the mess this morning.
Oh look! A picture of my nails and my book! ;-)
If you'd like to see what Tempest is all about and perhaps get a copy for yourself, head over to my web site for the blurb, sample chapters, and ordering links.

I'm about ready for fall colors - how about you? Next week, something in wine, I think...

Until then, happy polishing (and reading)!

Lunch Desire

Please excuse the tip pull in the final photos - I forgot to take the finals until the manicure was 5 days old. It was one of those busy weeks last week.

I wanted something kind of light, but mellow last week, and this fit the bill quite nicely. I started with two coats of Sephora by OPI "Let's Do Lunch".
Then I did the tips in OPI DS "Desire" - a very sparkly/glittery holographic brown.
I had some lovely gold stickers with a curly design, so I applied those at the smile line for some added bling and polish.
Two coats of Seche Vite and some clean-up, and that's all there was to it...easy peasy.
I still haven't had time to edit that video, but I'll see if I can't get a video of the stencils I'm going to try tonight for next week. Stay tuned...

Until then, happy polishing!